
How to Change Violin Strings
Contents
New Strings, New Life!
Changing the strings on your violin breathes new life into it. However, you don’t want to change them too frequently or too infrequently.
Before your violin strings break, it is recommended that you change them every 250-300 hours of playing.
It can be difficult to tell, but if you notice your strings are starting to lose their tone, fray, or appear worn, it’s probably time to replace them. Obviously, if one or more of the strings break, they must be replaced immediately.
It’s a good idea to check with your teacher before changing your strings if you take private violin lessons and training.
If you’ve never done something like this before, it can be difficult and intimidating to try it on your own. Changing the strings, on the other hand, does not have to be difficult. Here are some helpful hints and instructions for changing your violin strings.
1. Purchase New Strings
Strings for violins are usually sold in sets that correspond to the size of the instrument. This ensures that the string length matches the scale length of the violin. Strings are also available in a variety of quality levels.
The best violin strings for a beginner should be a well-known brand for new violinists. As you gain experience as a musician, your tastes will refine, allowing you to be more selective in your string selections.
2. Loosen the Strings, One at a Time
To begin, loosen the peg first. If your string is broken, you must first remove any remnants from the peg so that it can unwind. Take or unwind the string from the peg with care.
While loosening each string individually, make sure you keep the other strings firmly in your hand. After you’ve loosened the string enough on the top, the end of the string should fall out on its own.
If you need a visual, there is a simple tutorial you can follow.
If you try to remove all of the strings at once, the bridge will fall off. If you take them all off at the same time, it can cause a problem with the sound post on the inside of the violin, rendering your violin useless.
The most important thing to remember is to only remove one string at a time.
You’re ready to replace your first string once you’ve removed it. Before you buy, make sure you know whether your strings need to have a ball end or a loop end so you can replace the correct strings.
Some violins will accept either type of string end, so the type of strings you buy to replace them may not matter. It’s worth noting, however, that some violins may not be able to accommodate both types of string ends.
Please take your time to complete this task. It should take you about 20 minutes to change strings, possibly longer if this is your first time. There’s no need to rush. It becomes easier and faster once you’ve done it a few times and figured out the process.

3. Put in the New Strings
To begin, insert your ball or loop end into the bottom of your violin and tighten it across the bridge. A lead pencil can be used to lubricate the nut and bridge areas where the string will be laying against.
The lead acts as a lubricant, allowing your strings to lay more easily.
Control the string slack with your free hand by keeping tension on the string over the bridge the entire time. If you don’t hold it tightly enough, the loose end will continue to fall out, causing the ball or loop to fall out, making it frustrating and difficult to replace your strings.
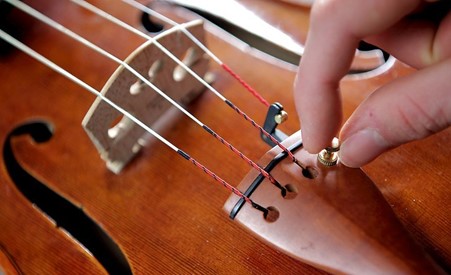
The next step is to insert the string into the hole where the peg will go. Then, insert the ball end into the fine tuner’s or tailpiece’s arm. When the peg is adjusted to allow you to see the hole, you can thread or feed the string through and begin winding it in.
Keep the strings in tidy order. You don’t want the string to cross over or under any of the other strings in your pegbox. The simplest way to avoid this is to position the peg so that the hole is visible from the inside of the box when you place the string in the space.
This will prevent the strings from mingling, allowing each string to have its own space.
(To make this easier, take a picture of the inside of your peg box before removing the strings to see where they should go.) As you become more familiar with the changing process, visual aids can help you see how to change your strings like a pro.
4. Wind the Strings into Place
Wind the string in towards the peghead, keeping it as close to the side of the pegbox as possible while doing so.
You want it close to the right side of the pegbox if you’re working with strings on the right side of the middle, and vice versa if you’re working with strings on the left side.
A simple way to do this is to use your free hand to push the slack from the string towards the peg you’re turning while winding it, and gently push the peg in while turning it.
This will wind the string against the scroll box’s sides, preventing the peg from unwinding once it is tightly wound. The tighter the peg becomes as you wind it, the harder you push it in.
It takes a little practice to figure out how much to push your peg as you go, so be patient and take it slowly at first.
Make sure there’s a little bit of the string’s “tail” hanging out when you wind it in, as this will make it easier to tune your string after you’ve wound it in.
Remember to keep tension on the string the entire time you’re winding it and putting it back into the peg.
As you wind the string in, make sure it’s on the nut and the board is properly positioned across the bridge. Most E strings have a small plastic sleeve on the bottom of the string, which you should push into the part of the string that goes on the bridge to prevent it from biting or digging into the bridge.
Make sure you don’t wind the string too tightly; you’ll need some space to tune it after you’ve replaced all of your strings.
Starting with loosening and unwinding, repeat the process with each string.
5. Tune the Violin
You can tune your violin using a tuner, pitchfork, piano, or anything else that can help you match the pitch to get the right notes after you’ve replaced the strings. You’re all set to play now!
If you are considering other repairs to your violin, check out our article.
How to Change Violin Strings FAQs
When should I replace my violin’s strings?
Your violin’s strings will wear out over time, and you’ll need to consider replacing them. Strings, on the other hand, can be very different from one another, and when you should change your strings depends on a number of factors:
The type of material used to make a string can have a significant impact on how long it lasts.
With a tuning peg, how do you tune a violin?
Place the string’s ball end into the fine tuner or the tailpiece’s hole. Check that the string is in the correct notches in the bridge and nut, then start tightening it with the tuning peg. Tighten it until it is approximately at the pitch it should be.
How can I tell if my violin is properly set up?
Examine the violin’s face and make sure the G and E strings are positioned correctly in relation to the fingerboard’s edge. You’ll need to re-center the bridge position if the violin’s strings appear to be too far in one direction.
His vast experience in the field allows him to provide the best advice and guides around a variety of musical instruments here as co-founder of NT Instruments
- Viola vs Violin – 5 Key Differences Between The Two Instruments - March 20, 2024
- 15 of the Most Famous Violinists of All Time (18th Century to Present) - March 20, 2024
- Full School Band Instruments List (Elementary / Middle / High) - March 18, 2024