

Violin Tuning – How To Tune A Violin + (Free) Online Tuner
Instrument tuning is one of the most daunting tasks that beginner musicians face. Yet in most cases, that’s more about the idea of tuning rather than the reality. Despite the long learning curve of the violin, tuning is actually not that difficult. It is something your violin teacher will go through with you but you can easily begin figuring it out yourself if you like.
That’s what this page is all about. It will walk you through violin tuning and the various tricks you will need to know to keep your instrument in tune.
We also have an online violin tuner that you can use to assist you during the tuning of your instrument.
There does initially seem a lot to take in when looking at tuning a violin.
But, like scales or form, with a little practice it quickly becomes second nature. With the help of this guide, we will have you tuning your violin accurately in less than an hour. Up for it? Let’s get tuning!
Contents
Free Violin Tuner
The following can be used as your free violin tuner:
If you want a reference note to be able to hear what your violin should sound like, simply click on the notes below. They are a full 3-minute recording of each note at the right frequency.
| G Note | D Note | A Note | E Note |
 |  |  |  |
| Click to Play | Click to Play | Click to Play | Click to Play |
Violin notes
Click here if you to learn more about violin notes, or read below for a summary.
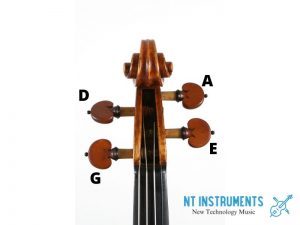
Violins typically have four strings, G, D, A, and E.
You can get five-string violins but that is out of the scope of this piece as it isn’t something a beginner would play. That fifth string is a C string (Do).
Musical notes are set at specific frequencies. Violin strings are held at a particular tension by the tuning pegs to achieve those frequencies.
Over time and continuous use, strings will move incrementally or stretch, losing that tension and thus, losing tune. It’s our job as violinists to recognise when our instrument is out of tune and correct it.
Knowing the specific frequency of a note allows us to correctly tune a note using a range of tools. Experienced violinists will be able to tune by ear.
Many hundreds, or thousands of hours practice will hone that ear to such a degree that you will be able to tune your violin to within a couple of Hz of perfect just by listening to it.
Until that time, we have a range of methods we can use to tune our violin. A few of which will feature on this page.
First, let us look at the strings and their relative frequencies.
G string
A violin’s G string is the lowest note it can play.
The frequency is set at 196Hz. If you face your violin, G is the largest string on the left. The G string is also referred to as Sol but you don’t really need to memorise that yet.
| G Note | |
|  |
| Click to Play | |
The tuning peg for G will be bottom left if you are facing your violin.
D string
The D string on a violin is the second string and it is set at 293.66Hz. It is the next largest string next to G and is also known as Re.
| D Note | |
|  |
| Click to Play | |
The tuning peg for D will be top left when facing your violin.
A string
The third string is A and it is set to 440Hz. It is third in line from the left and the second finest string. It is also referred to as La.
| A Note | |
|  |
| Click to Play | |
The tuning peg for A will be top right when facing your violin.
E string
The final string in your violin is E and it is set at 659.26Hz. The E string is the finest string on your violin and the one on the right. It is also known as Mi. Some violins will have fine tuners on all strings while others will just have a fine tuner on E.
| E Note | |
|  |
| Click to Play | |
The tuning peg for E will be bottom right when facing your violin.
As you can see, these are very specific frequencies.
Tuning your violin as close to these frequencies as possible is key to getting the most out of your violin. Mastery is challenging enough as it is without trying to play while your violin is out of tune!
Why tune a violin
It may seem obvious, but you need your violin to be in tune so you hear the note you think you are playing.
Having a violin that is in tune is essential for every musician but as a beginner, it is even more important. You are trying very hard to replicate the notes your teacher is showing you and need to learn to hear those notes.
You will only know if you hit the right note if the string is tuned to deliver that note.
If you practice on an out of tune violin, you may be replicating the notes perfectly with your fingers but you won’t be hearing the correct note. Therefore you will try to adjust your finger position to achieve the correct note, which will in fact be incorrect.
Plus, an out of tune violin is not always pleasant to listen to even when played by a professional!
Tuning tools
You can tune a violin using a few methods.
Experienced students will be able to tune by ear. Until you can do that there are other ways to achieve a well-tuned violin. You can use a piano to tune your violin, you can use online tools, a violin tuner, a tuning fork or another violin.
Each of these methods should result in you having a perfectly tuned violin. We won’t cover all of those methods here but we will cover tuning using a piano, using a tuner and an online tool.
Read More: 10+10 Best Student Violin for Beginners & Intermediates [Buying Guide]
Tuning instructions
Specific instructions for tuning a violin depend on the method you’re using but there are some general things you need to know. Setting everything up is key.
Your violin teacher may have a specific method for tuning but the general process looks like this:
- Set up your tuner, tuning fork, piano or another tuning method.
- Place the violin upright on your lap while you’re sitting down.
- Loosen the string you’re tuning a quarter turn.
- Pluck the string with your right thumb.
- Have the tuner/piano/fork play the note you’re trying to achieve, or click on the note above.
- Adjust the appropriate tuning peg upwards to increase tension gradually.
- Pluck the string, adjust, pluck, adjust until it is pitch-perfect.
- Repeat for all strings individually until your violin is in tune.
You may have to repeat this a couple of times to get everything perfect.
You may also have to repeat the example note repeatedly until you achieve a perfect pitch. This is normal and you will see professionals repeat the process again and again to ensure everything is just so.
Below find a few useful tuning tips:
Start from low to high
It is always best to start tuning from below the note.
For example, loosening the string so it is lower than the required note and gradually tightening until you achieve tune. This is certainly true as a beginner as it will prevent you from overtightening and breaking the string.
Don’t confuse starting low to high with the strings.
Here we talk about loosening a string if necessary and gradually increasing tension until you hit the right note. Starting low to high is also used to describe beginning the tuning process from the G string to the E string. Some violin teachers prefer to do it this way while others prefer you to begin at E and work down to G.
There is no ‘best’ way here. It makes sense to go along with your teacher. You can always change your mind when you have more experience.
Pluck, don’t bow
As a beginner, you will tune your violin by plucking the string and not by using the bow.
As you advance your skills, you will be expected to be able to tune on the fly by using the bow but that’s much later. For now, you just need to pluck the string to achieve tune.
Change one string at a time
If you’re tuning because you’re changing strings, remember to only ever change one string at a time. This will hold the bridge in place and ensure you keep the correct tension across the neck and body of the violin.
Change a string, tune it. Change another string, tune it and so on.
Never change all strings at once as it’s a lot of work to get everything working perfectly again!
Be patient
Violin tuning is as much part of being a violinist as playing classical music and requires the same practice and patience.
Start slowly and be in no hurry to tune your violin. You will gradually find the process becoming faster as you gain your ear and experience, but patience is key to begin with.
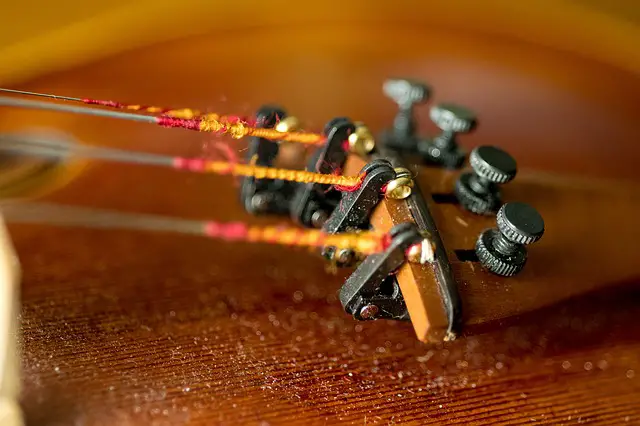
Use fine tuners if you have them
If your violin has fine tuners on the tailpiece, use those instead of the pegs.
It is harder to overstretch a string using fine tuners than when using pegs. Until you get used to how tight a string needs to be and how to recognise when a string has too much tension, it is much safer to use fine tuners.
If you only have a fine tuner on your E string, you’re just going to have to be careful with the others.
Make several passes to fine-tune
When you’re tuning each string, don’t just find the note and leave it there.
Try it a few more times and fine-tune if necessary. Once you have tuned all strings, go back to the beginning to make sure each string has stayed in tune. This is especially necessary if you have had to adjust all the violin strings.
As you increase tension on the strings, you will have also increased tension on the neck.
You will need to make sure the neck hasn’t moved enough to alter the tune. If it has, you will need to work through each note again until pitch-perfect.

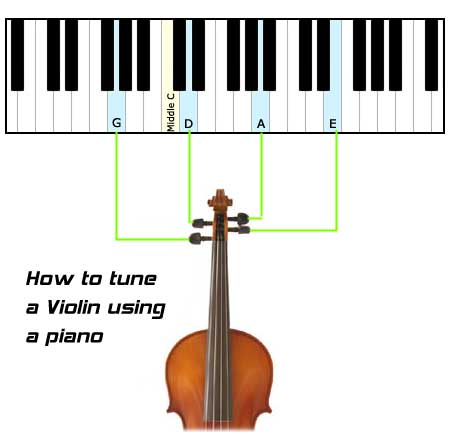
Tuning using a piano
Tuning using a piano is a very common method of violin tuning as the piano delivers very clear notes.
As long as the piano itself is definitely in tune, this method can be very effective. Use the G below middle C and hold the sustain pedal to keep the note going while you adjust your violin.
- Get everything ready and either sit at the piano or have someone else sit at it.
- Use the appropriate piano key for the note and sustain it.
- Pluck the G string on your violin.
- If the violin sounds lower, tighten the fine tuner until it matches. If the violin sounds higher, loosen the fine tuner until it matches.
As above, if your violin only has a fine tuner on E, use the tuning peg on G to adjust.
Repeat for the other strings. Violin D is above middle C, A and E are higher than middle C.
Tuning using another instrument
Violinists will often use other violins to tune theirs.
If you watch an orchestra preparing for a performance, you will often see the lead violinist hand their instrument to other violinists.
This is called ‘Passing round the A’ and is a way to ensure all other violins are tuned to the concermaster’s A and will, therefore, be in tune.
A violinist will make sure the A string is in tune relative to the lead violinist’s A and then play A and D together to assess the fifth. They will then play the D and G for the same and then A and E to tune.
This isn’t ideal for the beginner to learn right away but is definitely something you should learn once you begin getting your ear.
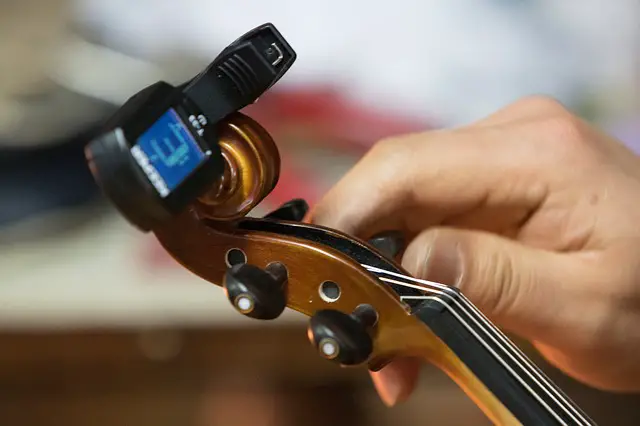
Tuning with an electronic tuner
Electronic tuners are excellent devices for hitting perfect tune.
Some beginner violin outfits come with an electronic tuner to make life easy or you can buy them for not a lot of money. They will usually be battery powered so make sure you always have spares to hand.
To tune your violin using an electronic tuner, do this:
- Turn on the tuner.
- Pluck the G string on your violin.
- Watch the display on the tuner and see where the note lies.
- Adjust the string up or down depending on what the tuner says.
- Repeat for all four strings.
Some tuners will have a string setting where you can press a button to set the string you’re tuning and a green light will appear if you’re in tune. Some will have digital displays while others will use an analog gauge and needle.
Some electronic tuners can actually play the note so you can teach your ear while tuning.
Get to know your tuner beforehand and learn where each note will register on the tuner when perfectly in tune.
Alternate tuning methods for the violin
You can also tune your violin using online tools, a pitch pipe or tuning fork.
These are different methods for tuning an instrument but work perfectly well. They also have advantages. Online tools are free and easy to access.
A pitch pipe and tuning fork are small, portable, don’t need batteries and you are more likely to have one of these than another violin or piano to help tune!
Violing tuning with an online tool
There are a number of online tools that can help tune a violin – such as our method above.
As long as your phone or computer can accurately reproduce the note, many of these tools will play the correct G, D A and E notes from which you can tune the corresponding string.
Using a pitch pipe
A pitch pipe is a very simple but effective way to tune any instrument.
They come with some violin outfits but are available in most quality music shops. They are not as exact as a tuning fork or these other methods as you can alter the frequency slightly depending on how hard you blow the pipe but it’s a useful extra tool to learn.
Set the pipe to the correct note and blow steadily. Adjust the violin to match.
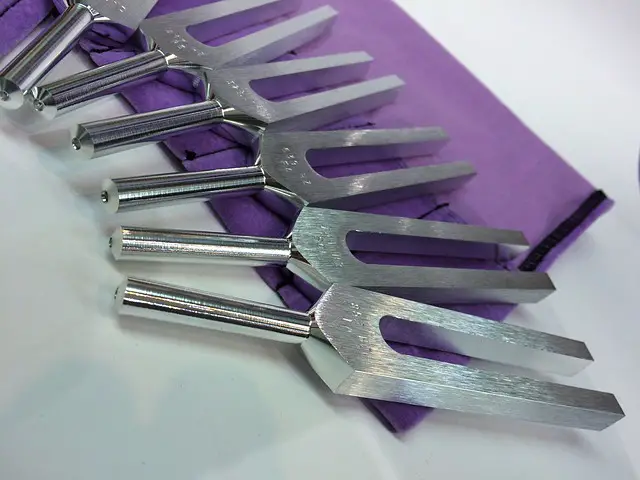
Using a tuning fork
Using a tuning fork is probably the oldest form of instrument tuning known to man.
It isn’t ideal for beginners as you’re still learning your ear but it is good practice. Most violinists will carry an A fork for tuning the violin’s A string. From there you can also tune the other violin strings in perfect fifths.
Hold the tuning fork by the stem and simply tap the tuning fork at the end to hear the note. Hold the stem of the tuning fork against the violin to hear it reverberate.
Common violin tuning problems
As a beginner, you will face a few challenges while learning to tune the violin.
None of them are insurmountable but they can be frustrating. Here are a few of the more common issues you may come across when starting out.
String will not remain in tune
If you have tuned your violin but it quickly goes out of tune again, it could be down to a couple of things.
- The tuning peg is loose,
- the string is not attached properly,
- the bridge has moved or is damaged or
- the tailpiece has moved or is damaged.
Check each of these carefully.
Check the pegs first as these can be a common cause, especially on older violins. Make sure the peg remains taught and doesn’t slip and that any fine tuners are securely attached and done up tightly enough.
Strings break frequently
Breaking a few sets of strings is part of the rite of passage for all new violinists but is an expense you could do without.
This happens either because the strings are old and worn or because you are overtightening them. Depending on the quality of strings you use, they should be good for 3-6 months of play depending on how often you practice.
Strings breaking during or shortly after tuning means you are either not tuning up to the note as discussed above or are overtightening the strings.
Loosen one string at a time, tune and work your way through all strings. Then perform another pass to make sure they all stay in tune.
New strings go out of tune too quickly
If you have just changed your violin strings and find they go out of tune within a few hours, that’s normal.
Depending on the quality of the string, they will stretch slightly as they are used. This is expected and you will just need to tune accordingly.
Once you have tuned them a couple of times, they should remain in tune.
If they don’t, refer to ‘String will not remain in tune’ above.
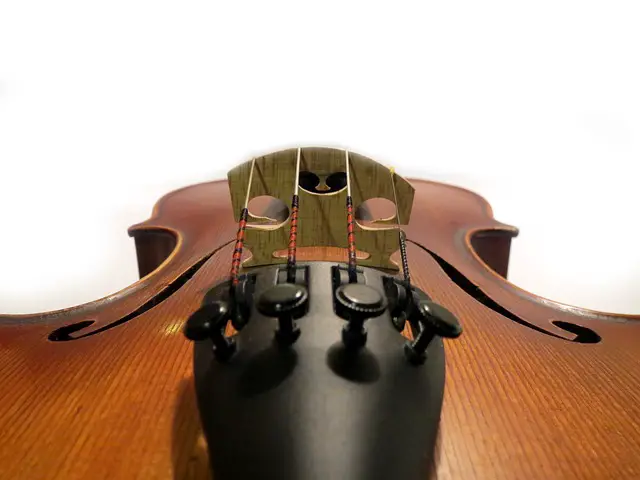
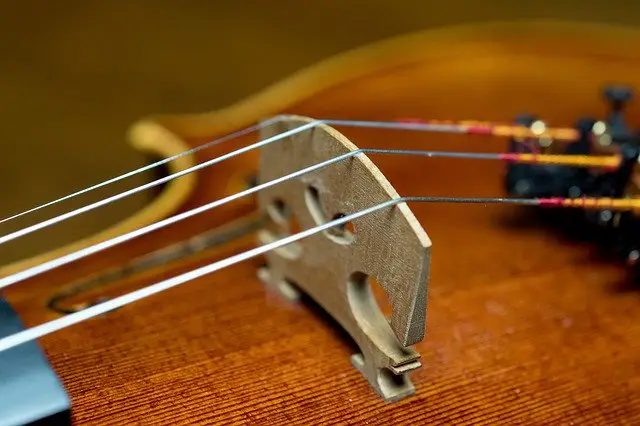
The violin bridge has moved
The bridge of your violin is not fixed into place. It is held in place by the tension in the strings.
If the bridge moves, it may indicate your strings are not tight enough. If the bridge tiles slightly, this is normal.
Just loosen the strings slightly, straighten the bridge, tighten the strings the same amount as you loosened them and tune the strings.
Violin tuning FAQs
Still have questions around tuning your violin? Want to know something we didn’t cover above?
1. How is a violin tuned?
A violin is tuned by adjusting string tension until it can achieve the correct frequency for the note. The G string should be set to 196Hz, D string 293.66Hz, A string 440Hz and E string 659.26Hz. You adjust this tension using tuning pegs or a violin’s fine tuner if it has them.
2. How much does it cost to tune a violin?
Violin tuning costs vary depending on who does it. If you have read this article, you will already know that you can tune your own violin for free as long as you have the tools to do it. If you take your violin to a music shop, they will charge a small fee to tune your violin but can also show you how to do it. Your violin teacher can also teach you how to tune, so would cost whatever hourly rate you pay for a lesson.
3. Can you use a guitar tuner for a violin?
You can tune a violin with a guitar tuner. Most guitar tuners use frequency detection (chromatic tuning) to tune which will work perfectly well on a violin. Guitar tuners work in exactly the same way as digital tuners as discussed above. Set the frequency, pluck the string, check for low or high and adjust as needed.
This page discusses using a guitar tuner on a violin in great detail.
4. How do you tune a G string on a violin?
Tuning a G string on a violin means adjusting the tension to hit exactly 196Hz. You do this with the help of a digital tuner, tuning fork, a piano or other instrument or one of the methods mentioned on this page. Adjust the string tension using the tuning peg or fine tuner until perfect.
Violin tuning for beginners
As we said at the beginning, at first glance, the subject of violin tuning may look quite daunting.
You will now know that it isn’t as complex as it initially seemed and is a logical process that uses tried and tested methods to achieve perfect tune. It is something every violinist needs to get to grips with but certainly isn’t anything to be afraid of!
His vast experience in the field allows him to provide the best advice and guides around a variety of musical instruments here as co-founder of NT Instruments
- Viola vs Violin – 5 Key Differences Between The Two Instruments - March 20, 2024
- 15 of the Most Famous Violinists of All Time (18th Century to Present) - March 20, 2024
- Full School Band Instruments List (Elementary / Middle / High) - March 18, 2024